2. Adding external geodata resources - DAE
the workshop starts here
In this workshop we will add external geodata resources to our Qgis project.
This workshop is made with Qgis version: 3.26.3-Buenos Aires
Preperation
How does this workshop work?
Everytime when you see this: there is a action for you to take on your computer. The text around it is explanation or support. First read a few lines before going to the action points. Sometimes it helps to read further on to better understand what you will be doing.
In the workshop you will find hyperlinks to external resources. Always click with the right mouse button and choose: Open link in a new tab. To not loose the workshop page.
On the right side of the screen you see the contents of the workshop. This also works as a navigation through this page.
What do you need
- A computer
- Internet
- Example data
- Qgis version > 3
- This workshop
Try to work with 2 screens. This way you can have the workshop on 1 screen and Qgis on the other screen (or use a tablet or phone for the workshop).
Preperation
Create a working directory for this workshop, on your computer. In this directory we will place all data and files for this module. During the workshops this will be referred to as 📂 working directory
Download the example data and save it in the 📂 working directory.
Download & install Qgis here
Qgis Documentation
A lot can be found about Qgis online! Please use this. Every tool, feature, term and button can be found and explained in the Qgis documentation.
Preparation
Open a new project or continue with an already existing project.
Let’s start. We will start with a empty project.
Go to Project > New

Save this project file in your 📂 working directory and give it a clear file name. Make sure to save regularly Save [Ctrl+S].
Go to Project > Save or Save as..
a Qgis project file The file format of a Qgis Project is
.qgs/.qgz. (qgzis the zipped format ofgqs) A qgis porject does not contain any data! Only the references to the data and the styling of the data. If you want to share your project with someone else, make sure to share the project file and the data!
Where to find data
Dutch resources
- https://nationaalgeoregister.nl/geonetwork/srv/dut/catalog.search#/home
- https://www.pdok.nl/dataset_v1
- https://www.cbs.nl/nl-nl/dossier/nederland-regionaal/geografische-data/
- data.overheid.nl
- https://viewer.satellietdataportaal.nl/@52.06431,4.691162,8
- https://themasites.pbl.nl/atlas-regio/
- https://www.topotijdreis.nl/
- https://data.eindhoven.nl/pages/home/?flg=nl-nl
Global resources
- https://www.naturalearthdata.com
- https://www.openstreetmap.org
- https://www.geofabrik.de/data/index.html
Geo data formats
Any geo data you can download online we can save and add to our project. Look for files with these extensions:
- GeoPackage .gpkg
- ShapeFiles .shp
- GeoJson .geosjon
- Google .kml .kmz
- GPS exchange .gpx
A Shapefile actually exists our of multiple files : .shp .shx .dbf and more Together they form the right dataset. We only add the .shp file to our project, Qgis will take care of the rest!
A GeoPackage exists out of 1 file. But when we open it in Qgis we can see some temporary files created in the browser. We can ignore those, do not remove them.
Adding downloaded data to QGIS
Download some data that you found and save these in the 📂 working directory.
When storing the data next to the Qgis project in the 📂 working directory then it is really easy to find it in the Qgis browser and open it up.
There are a lot of ways to add data to Qgis.. This can be very confusing. So let’s have a look at the possibilities:
- Through the menu
Layer>Add Layer - The buttons in the
Manage Layer toolbar - Open data from the
Browserpanel - Just drag your geo data file from the file browser on your computer into the map view of Qgis. (yes is works too!)

In this workshop we will mostly use the Browser panel
Browser - Project Home
In the Browser panel, unfold the Project Home directory.
This is the folder where the current Qgis project is saved. If you also saved the example data there then we can quickly add them! Can you already see our example datasets?
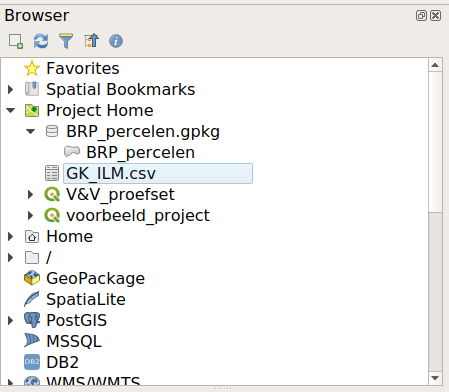
The icon before the file indicates what kind of data it is.
A GeoPackage file is a small sql-lite database, that’s why we see the database icon. If you expand this you see the geo data geometries.
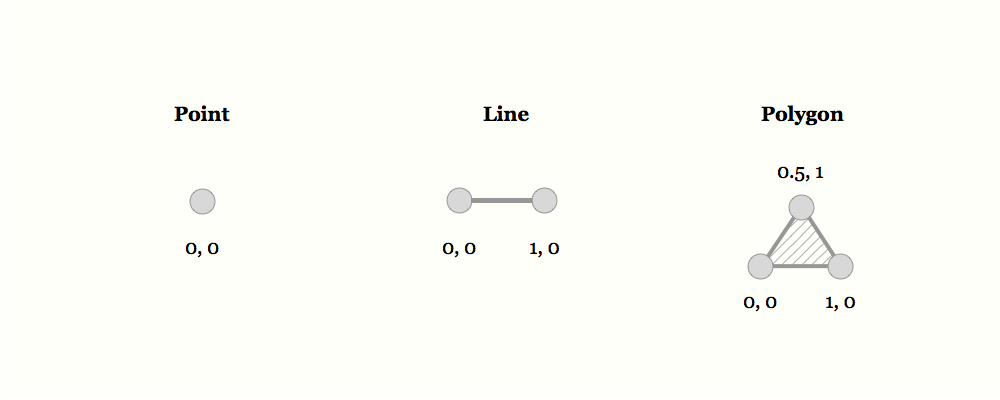
For example the BRP-parcels are of the type: polygon.
Drag in the data files
Just drag your geo data file from the file browser on your computer into the map view of Qgis. (yes is works too!)
Try it! We can simple drag a .gpkg or .shp file into the Qgis screen and the data will show.
Adding a WMS or WFS service
Sometimes we find a url of a WMS or WFS service online. For example here at the PDOK website.
A WMS url looks like this:
https://service.pdok.nl/rws/ahn/wms/v1_0?request=GetCapabilities&service=WMS
Open the link in an internet browser. What does it show? Look for the place where it says Layer, can you find which data is available?
Now let’s add it to Qgis. In the Browser panel find the WMS/WMTS option.
Right click on this > New Connection
Also possible at the menu >
Layer>Add Layer>Add WMS/WMTS Layer>New
Give the connection a logical name and paste the above url into the URL window
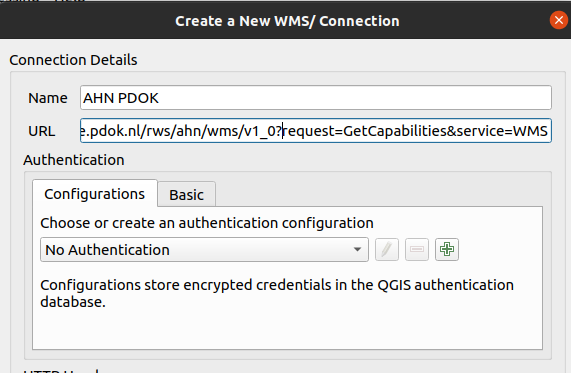
In the Browser panel, fold down the WMS/WMTS directory and see your added connection. Fold these down until you see the available layers. Double click on a layer to add it to the project!
a WMS retrieves an image of the data! not the geo data itself.. Therefore it is not possible to style the data to our own liking. When using the
Identify featurestool, an extra request is made to the server to retrieve the infomation. See that there is also noAttribute tableavailable?
Adding a WFS service
This works the same for a WFS service! But make sure you use the correct url MS url looks like this:
https://service.pdok.nl/kadaster/bestuurlijkegebieden/wfs/v1_0?request=GetCapabilities&service=WFS
Open the link in an internet browser. What does it show? Look for the place where it says Layer, can you find which data is available?
Now let’s add it to Qgis. In the Browser panel find the WFS/OGC API -Features option.
Right click on this > New Connection
Give the connection a logical name and paste the above url into the URL window
In the Browser panel, fold down the WFS/OGC API -Features directory and see your added connection. Fold these down until you see the available layers. Double click on a layer to add it to the project!
Saving data from a WFS
Because a WFS does retrieve the geo data, it is possible to save it, or a selection from it, to our own computer.
Add the Gemeenten (municipalities) WFS layer to our project.
Select the municipalities of Oirschot and Best. Do this by using the Select Feature(s) tool in the selection toolbar. Click on one municipality, it turns yellow > hold Ctrl > click on the next.

All features turning bright yellow are selected!
Now right click on the layer in the Layers panel and choose Export > Save Selected Features as
Save it as a GeoPackage and make sure to strore it in you working directory.
The layer is locally stored and also immediately added to our project! We can remove the WFS connection now.
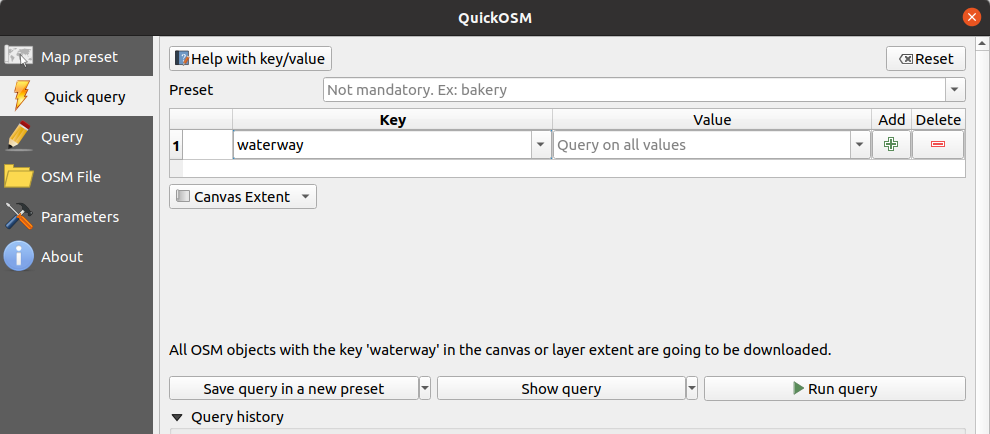
Quick OSM downloads plugin
Follow this tutorial for the QuickOSM plugin:
https://docs.qgis.org/3.28/en/docs/training_manual/qgis_plugins/plugin_examples.html
Instead of railway we will add the waterway
And choose Canvas extent instead of Layer extent
Available WFS and WMS sercices in the PDOK plug-in
In the PDOK services plugin also a lot of data and services can be found and added.

The left button on the toolbar brings you to the PDOK services window. All data that PDOK and other Dutch governmental agencies provide can be found here!
Click on the blue PDOK + button on left side of the toolbar.
Search for : natura2000
There are multiple datasets available. Make sure you choose the natura 2000 of the type WFS service.
Add this layer to the map view and close the panel.
Use the Identify Features tool to click on the area. What kind of attribute data is available? What is the name of this area?
Again search in the PDOK services for : bodemkaart (soil map) and add the layer Bodemvlakken - WMS - BRO Bodemkaart (soil information)
Again use the Identify Features tool to click on a area. What kind of attribute data is available?
- Did you notice the difference in data types between the
naturaareas and thebodemkaart? - What kind of difference is there?

You reached the end of this workshop!


